Development process:
The test access process is divided into the platform domain and device domain to help you experience the first access and roughly understand the platform features and access protocols.
Test flowchart
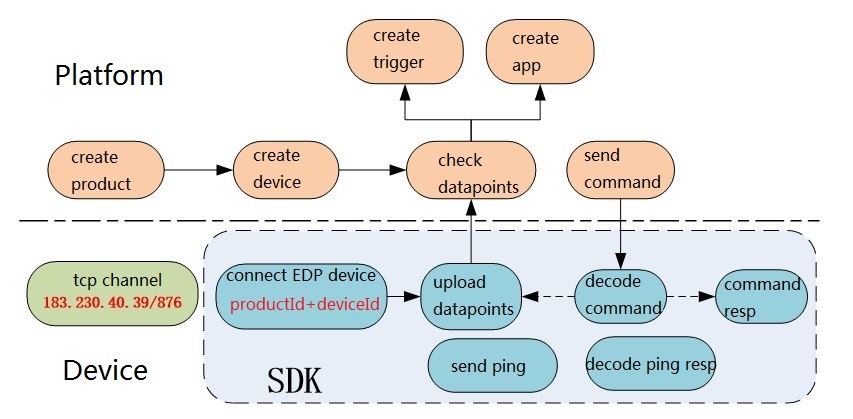
The access steps are as follows:
Step 1: Create a product and select the access protocol.
First, you need to create a product using the EDP access protocol in the platform, and record the product ID.
Step 2: Create a device and record the device ID and other information.
There are two ways to create a device.
(1) Click “Add Device” in the page, enter the device name and authentication information (i.e. device number), and record the device number.
(2) Create a device by calling the device creation API, and enter the device name, access protocol, authentication information, MasterKey and other information. The device will be created in the platform.
Step 3: Establish a protocol connection between the device and platform.
Use the parameters in Step 1 and Step 2 as login parameters. Organize the EDP connection message with the corresponding interface in the SDK, send it to the platform and establish an EDP connection with the platform.
Take the C language SDK as an example:
/* Package the connection protocol by PacketConnect2 in EdpKit.h of SDK */
EdpPacket* send_pkg = PacketConnect2(PID, AUTHINFO);

/* Send connection protocol packet data*/
int ret = DoSend (sockfd, send_pkg->_data, send_pkg->_write_pos);

/* Delete send_pkg after use; otherwise, memory leakage will occur */
DeleteBuffer(&send_pkg);
If the connection succeeds, there will be an online mark in the device information:

Step 4: Create the data stream and upload the data point.
Write a code by the interface function in the SDK and upload data to the platform.
Take the C language SDK as an example. Upload a set of data points (temperature: 18°C; humidity: 80%RH).
cJSON *json_data = cJSON_CreateObject();

cJSON_AddNumberToObject(json_data, "temperature", 18);
cJSON_AddNumberToObject(json_data, "humidity", 80);

EdpPacket* send_pkg = PacketSavedataJson(NULL, json_data, kTypeSimpleJsonWithoutTime, 0);

/*Send the stored packet data and upload data points*/
int ret = DoSend (sockfd, send_pkg->_data, send_pkg->_write_pos);

/* Delete send_pkg after use; otherwise, memory leakage will occur */
DeleteBuffer(&send_pkg);

/*Delete the constructed json object*/
cJSON_Delete(json_data);
Step 5: Display the data stream and view data points.
Click “Data Display” under “Device Management” of OneNET to enter the data display page. Click the drop-down menu to view the recently uploaded data points. You can also select the time interval to view the historical time.
In the above test flowchart, users need to manually add devices in the platform, and then perform the device domain access. When a large number of devices are connected, there will be many unnecessary operations.
Therefore, the batch access solution is recommended to connect devices in batches.