NB-IoT Device Access and Development Guide
STEP 1 Create a product and select the access protocol
STEP 2 Create a device and record device ID
STEP 3 Transplant SDK or carry NB module, and establish UDP connection
STEP 4 Establish the protocol connection between the device and platform
STEP 5 Check the device resource list
STEP 6 Check the device resource list and operation resource data
STEP 7 Conduct the application of NB-IoT according to actual scenes
The test access process is divided into the platform domain and device domain to help you experience the first access and roughly understand the platform features and access protocols.
Test flow diagram:
Process of access based on NB module/SDK:
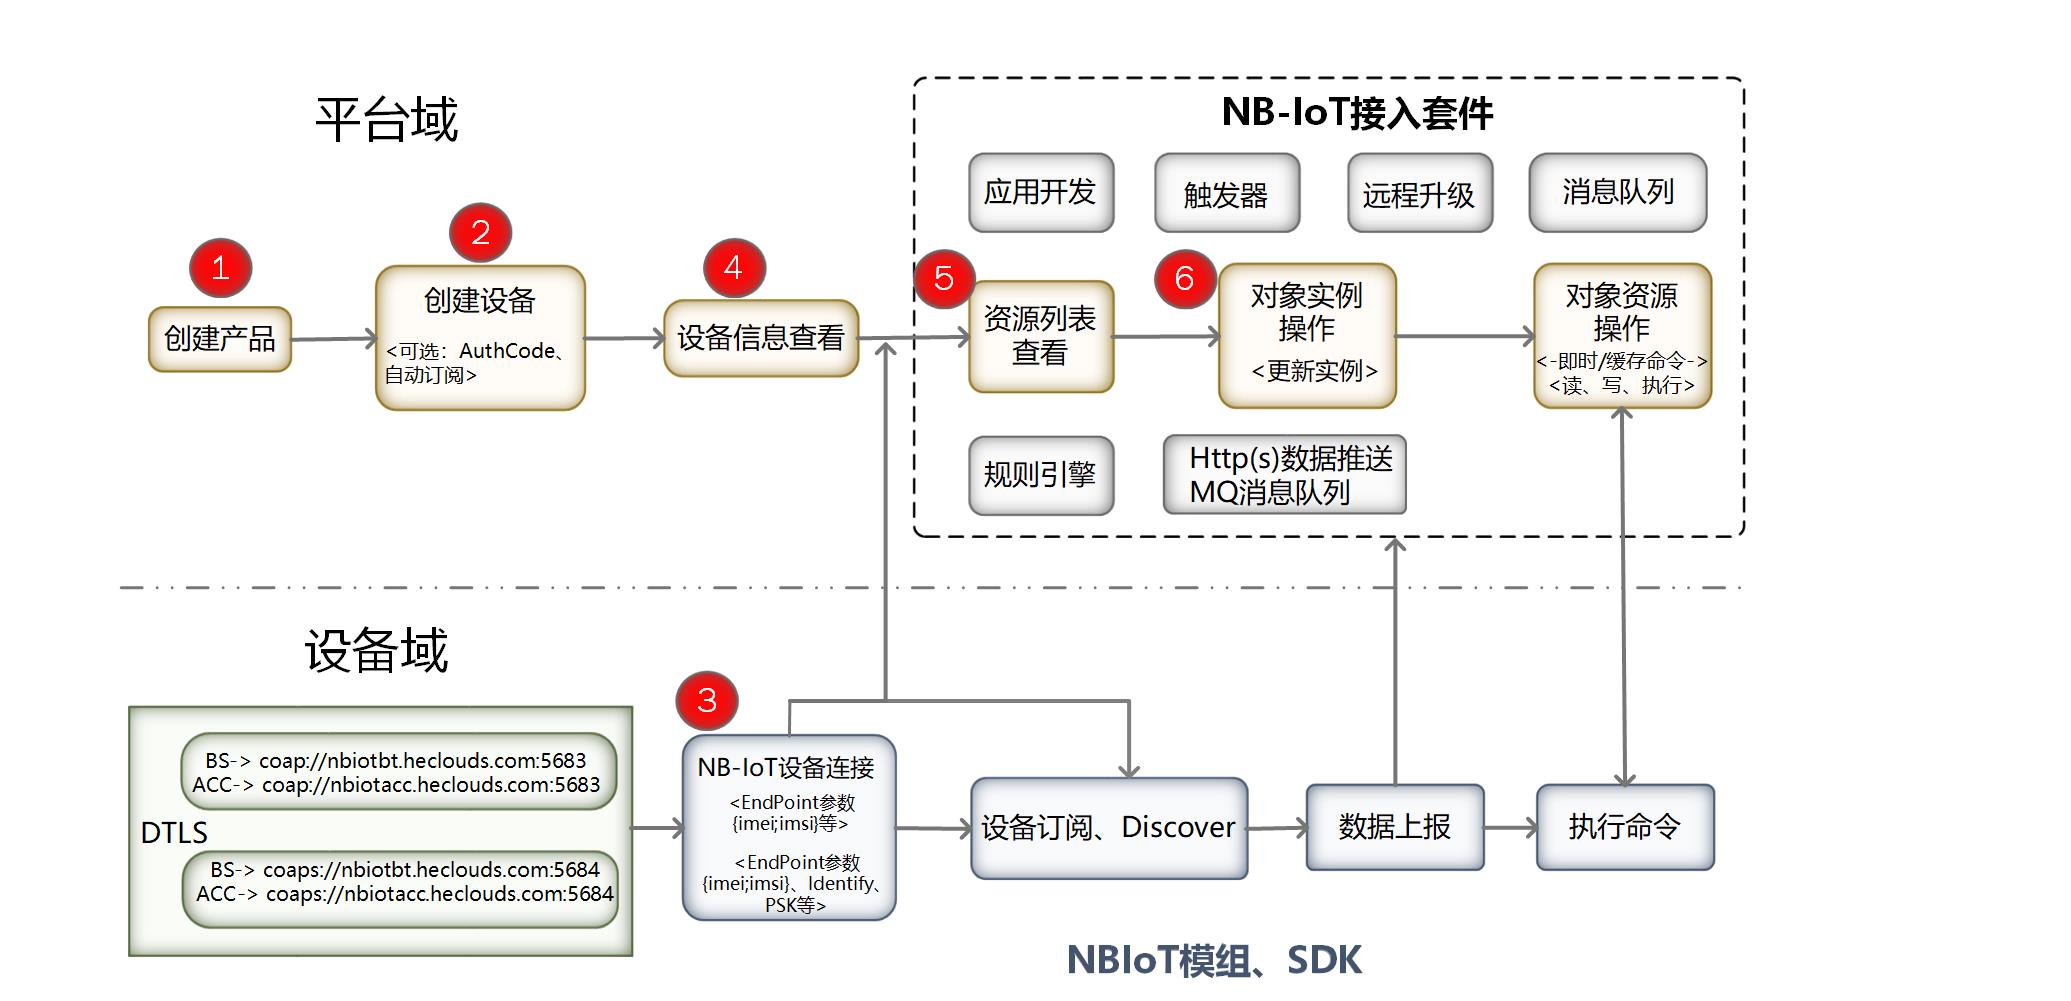
▹ STEP 1 Create a product and select the access protocol.
First of all, you need to create a NB-IoT product on the platform and choose LwM2M protocol (because NB-IoT device needs to be connected to the platform through NB base station, please choose “NB-IoT” when creating the product) when the device is connected to the protocol; for the specific creation procedures, please see "product creation".
After creation of the product, record the product user ID.
▹ STEP 2 Create a device and record device ID
⨀ Type I
Click "add device" on the page, input the device name and authorization information (namely IMEI, IMSI); for the resource model of the platform, please check resource model, and record the device number.
⨀ Type II:
Create the device by invoking the device creation API; input the device name, access protocol, authorization information and MasterKey to create a device on the platform.
▹ STEP 3 Transplant SDK or carry NB module, and establish UDP connection.
According to the actual access mode of NB-IoT device, currently, there are mainly two types:
⨀ Type I:
NB-IoT device carries the NB module having been connected to OneNET platform; the device can interact with OneNET platform through the connection with NB module, NB base station, core network and other network elements to establish UDP connection with Bootstrap Server.
The specific mode is: After the device is powered on, it sends AT instruction to the module taking the authorization parameters, including: Endpoint-Name (IMEI; IMSI), Authcode (NULL by default) to realize UDP connection between the device and platform. After the connection is successfully established, Bootstrap Server will return LwM2M access server address and port;
The NB modules that have been connected to OneNET platform are shown in the table below:
For the list of all modules, please see the list of supported modules
| Full name of the terminal manufacturer | Module model | Service pattern protocol version | Chip model |
|---|---|---|---|
| China Mobile IOT Co., Ltd. | M5311 | R14 | MT2625 |
| China Mobile IOT Co., Ltd. | M5310-A | R14 | Hi2115 |
| China Mobile IOT Co., Ltd. | M5330-GNSS | R14 | MT2625 |
| China Mobile IOT Co., Ltd. | M5312 | R14 | RDA8908A |
| China Mobile IOT Co., Ltd. | M5330-A | R14 | RDA8908A |
| China Mobile IOT Co., Ltd. | M5310-SE | R14 | Hi2115 |
| China Mobile IOT Co., Ltd. | M5313 | R14 | RDA8909B |
| China Mobile IOT Co., Ltd. | M5330 | R14 | MT2625 |
| China Mobile IOT Co., Ltd. | S5601 | R14 | MT2625 |
| China Mobile IOT Co., Ltd. | M5310-A-CM | R14 | Hi2115 |
| China Mobile IOT Co., Ltd. | M5311-CM | R13 | MT2625 |
| China Mobile IOT Co., Ltd. | M5313-CM | R13 | RDA8909B |
⨀ Type II:
NB modules carried by NB-IoT device are not connected to OneNET platform; there are two modes:
- (1) Work to connect NB module to OneNET (if you intend to connect to OneNET platform, please click here).
- (2) Users need to download SDK of NB-IoT, and transplant it to the device MCU after relevant development work.
If SDK has been successfully transplanted to MCU, configure Bootstrap Server address, port number, and endpoint name parameter (namely, authorization information IMEI, IMSI etc.) in MCU, and then realize UDP connection with Bootstrap Server through SDK.
After the connection is successfully established, Bootstrap Server will return LwM2M access server address and port.
bootstrap service domain name:
coap://nbiotbt.heclouds.com port number: 5683
coaps://nbiotbt.heclouds.com port number: 5684
Support the access through IPV6 protocol; IPV6 access doesn’t support bootstrap now; please configure the connection.
ACC address:
2409:8060:8ea:601::1864 port number: 5683
2409:8060:8ea:601::1864 port number: 5684
▹ STEP 4 Establish the protocol connection between the device and platform
After the device acquires the address for LwM2M to be connected to the server in STEP 3, the device will automatically finish the protocol connection with the platform.
If the connection succeeds, there will be an online mark in the device information:
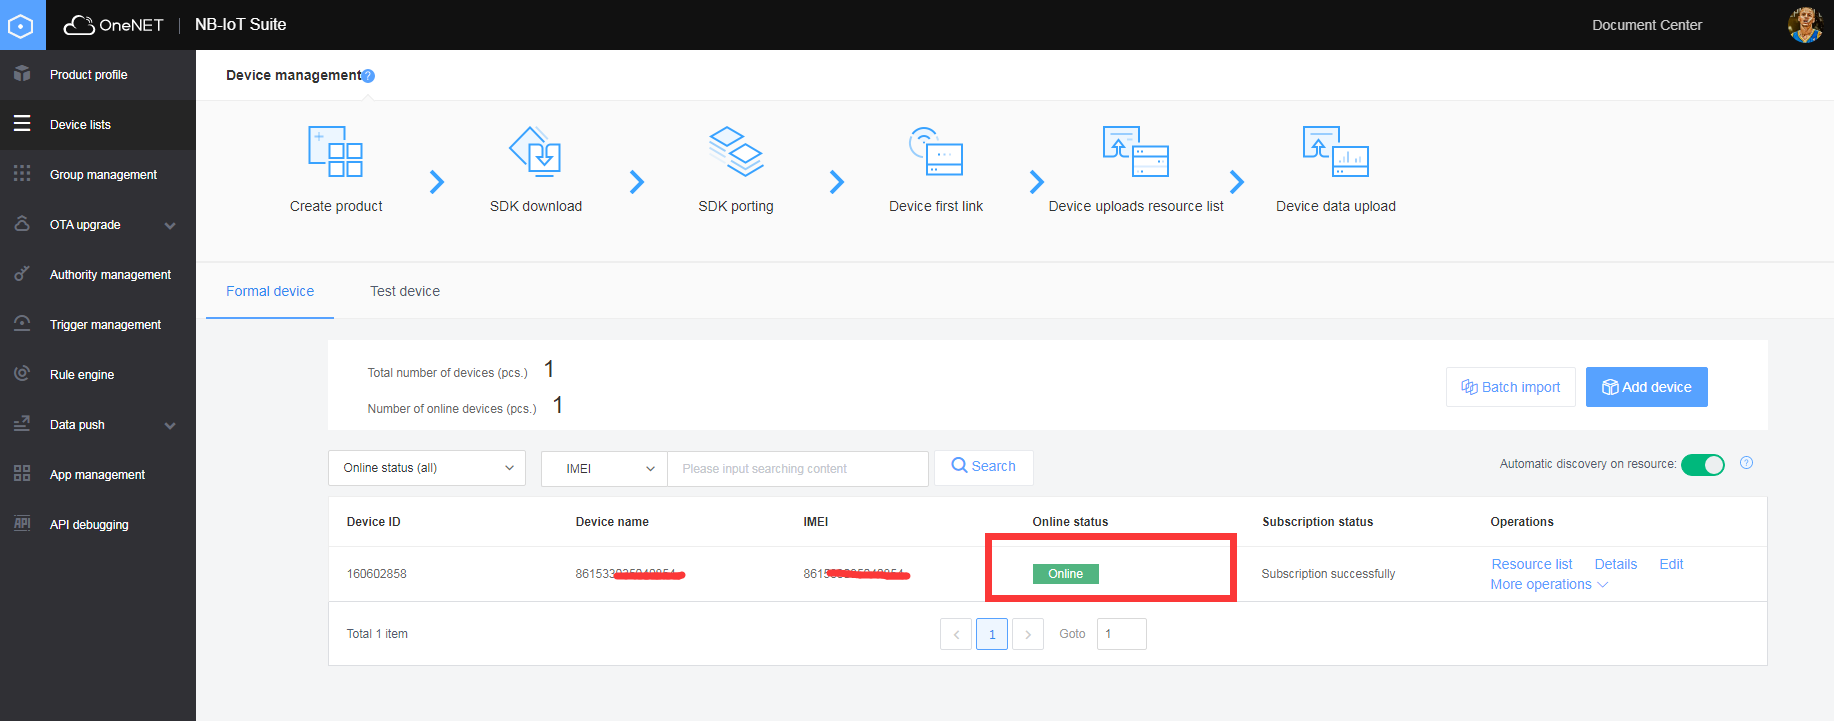
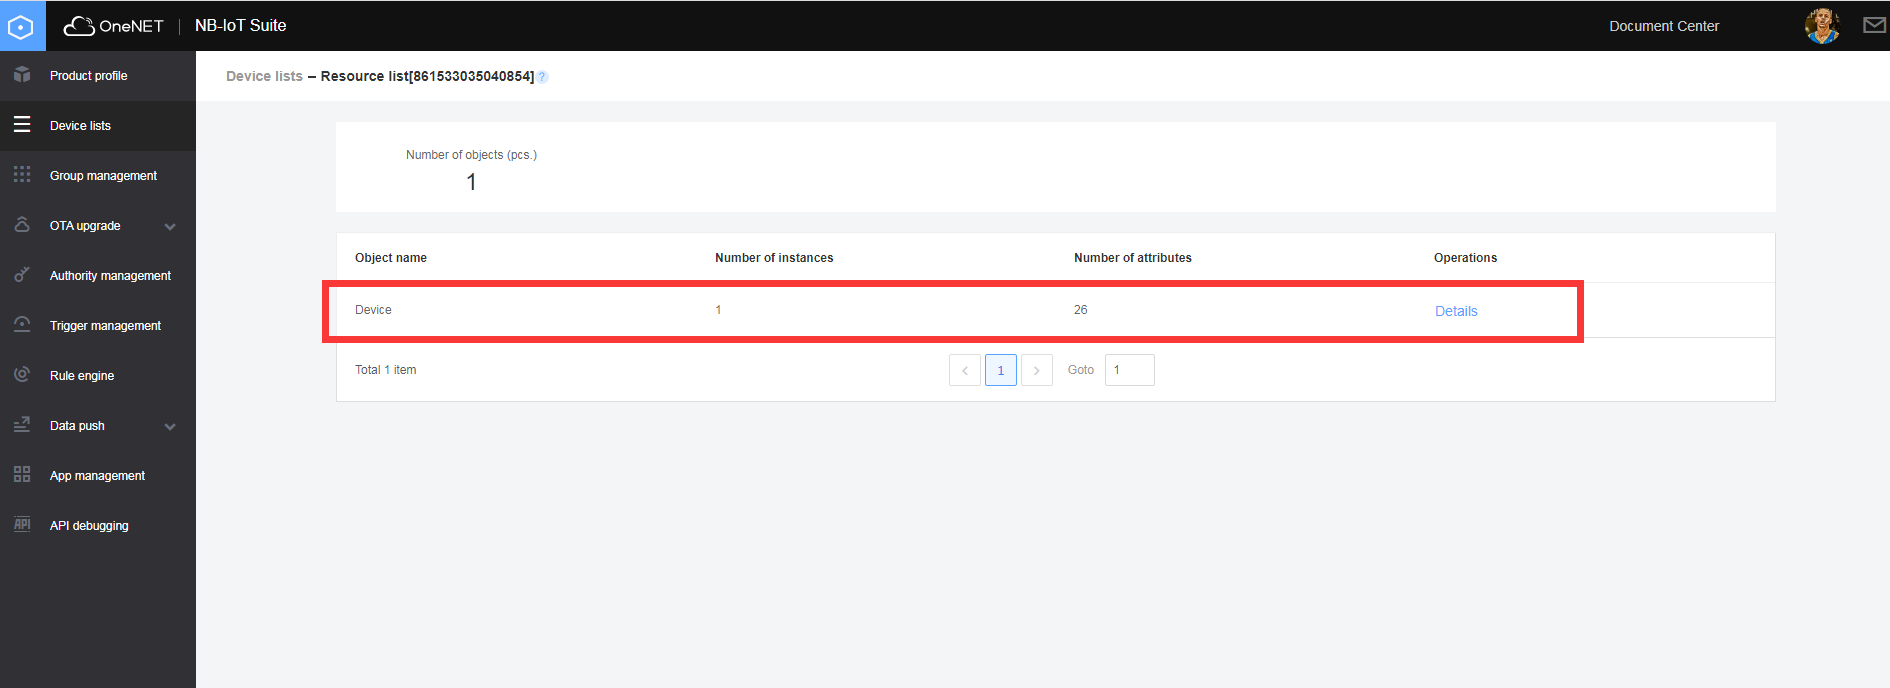
▹ STEP 5 Check the device resource list
After the device is connected in STEP 4, click the "resource list" on the rightmost side to enter the resource list of the device to check the information.
After the device is connected, it will upload a resource list to the platform, and the platform can read, write, implement and subscribe these resources.
The object name, instance number and resource number under the device can be found in the resource list.
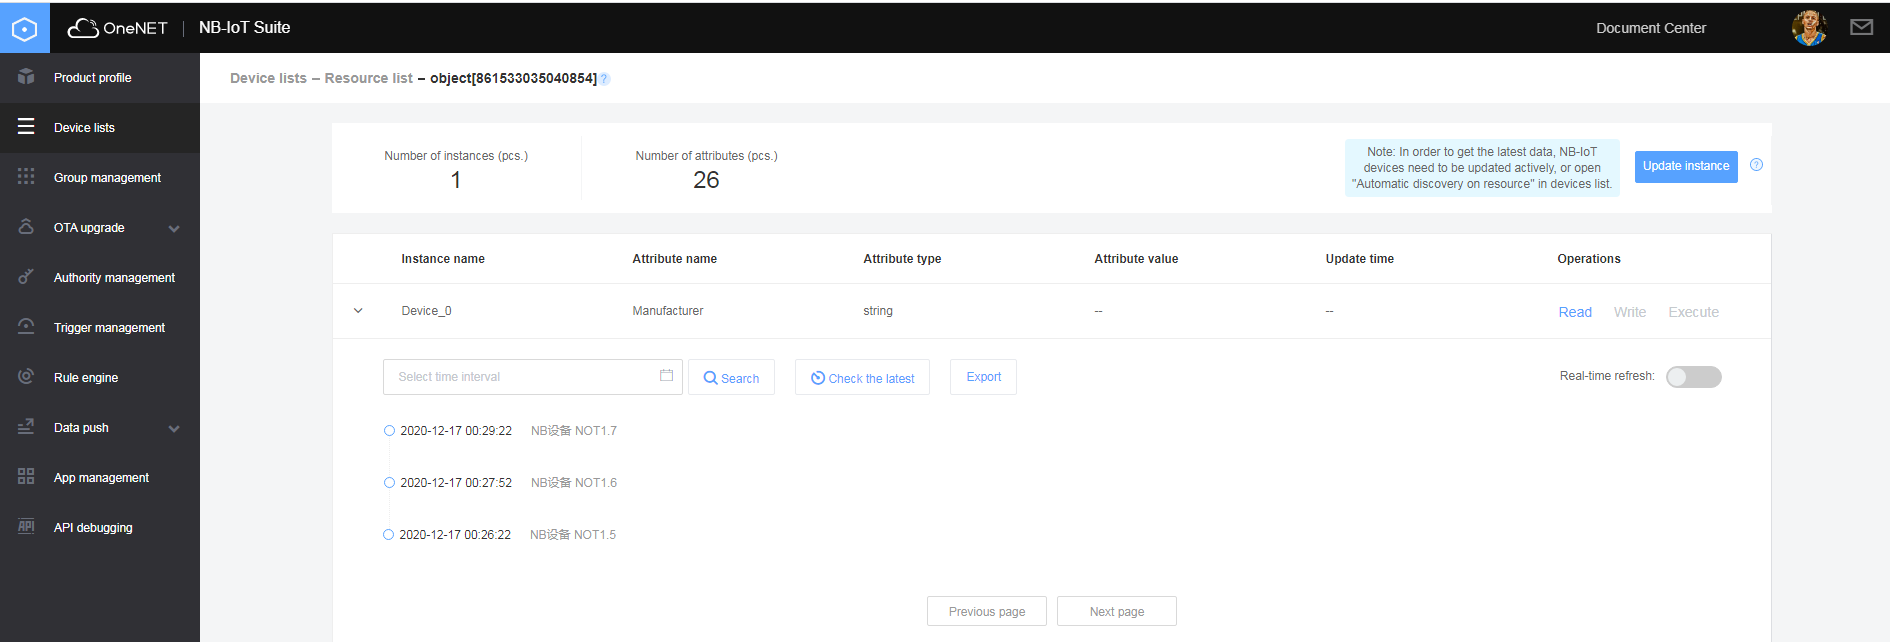
▹ STEP 6 Check the device resource list and operation resource data
After seeing the device resource list in STEP 5, click a specific object name to see a specific object instance and the attribute value of the object instance.
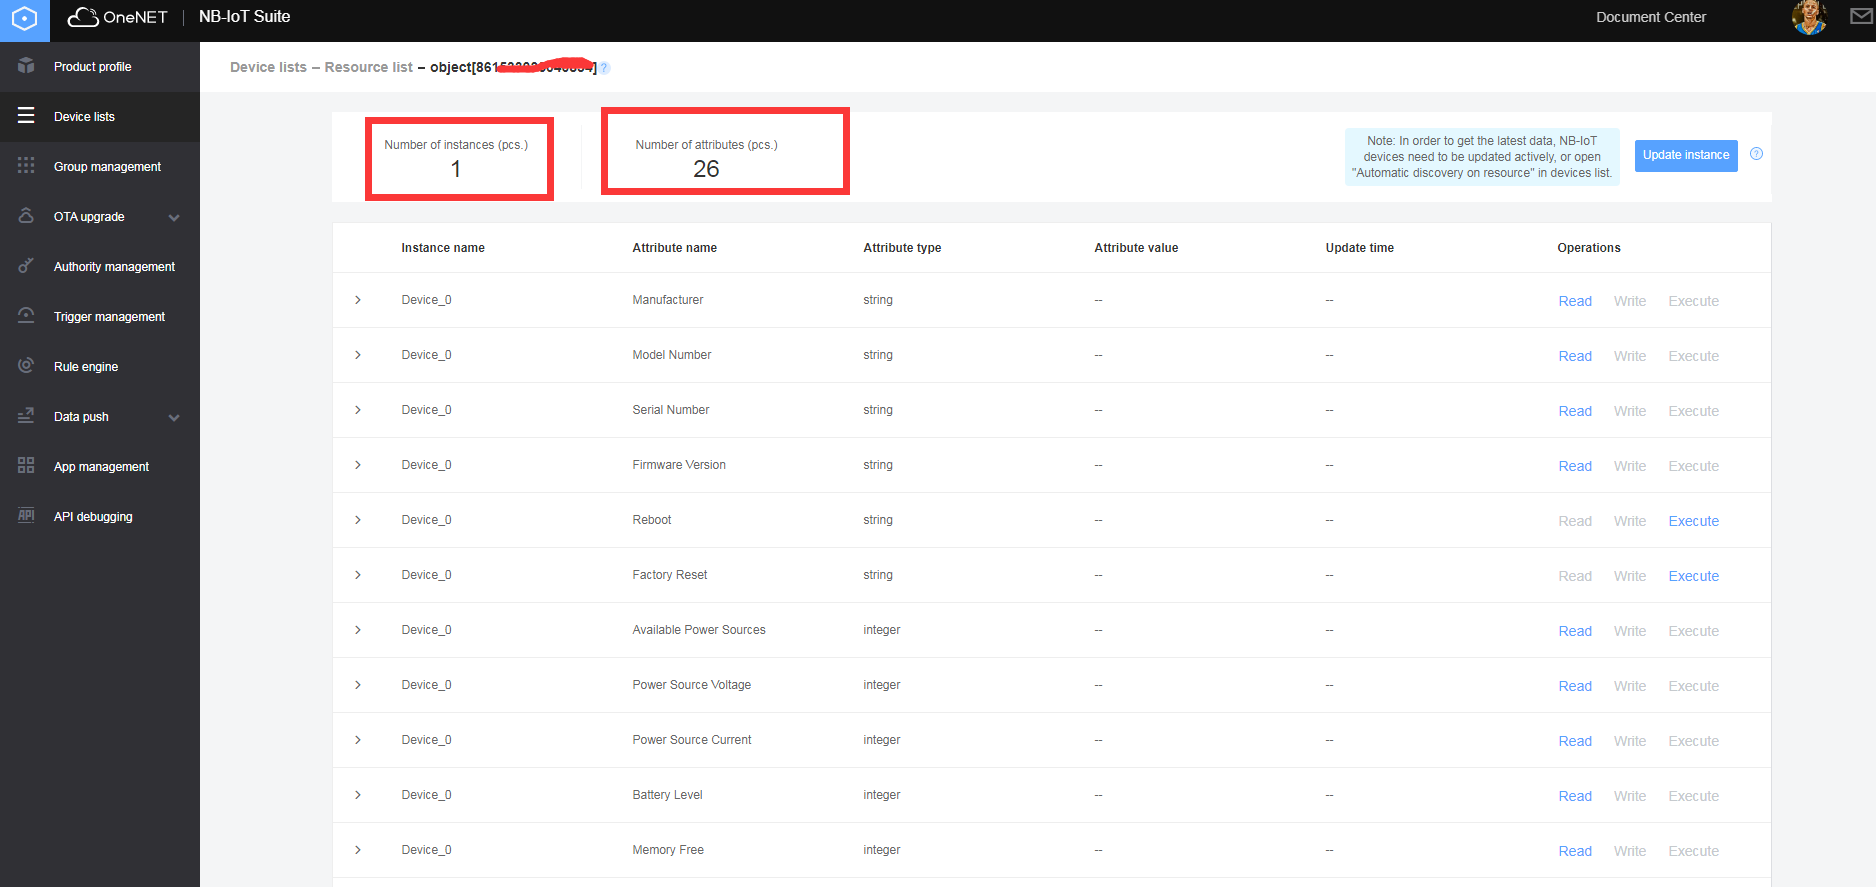
On this page, users can read, write, and implement a certain resource and check the details, and finish the actual operation of a certain resource of the
device.
▹ STEP 7 Conduct the application of NB-IoT according to actual scenes
Through the above operation from STEP 1 to STEP 6, users can realize the actual operation of NB-IoT device connection, check the resource list, read, write and implement the object resource, etc. to implement the entire NB-IoT application in NB environment.