Overview of Upgrade Process
1 Log in and enter development center
5 to verify the upgrade.
2 Remote upgrade OTA entry
6 Add differential package
3 Select remote upgrade type
7 Add upgrade device
4 Upload firmware package to the platform
8 Call of API of device side
To provide firmware upgrade service from OneNET platform, it needs to ensure the device side supports OTA service, then new firmware package shall be uploaded at OneNET platform and the device detects upgrade task, i.e. on-line upgrade is completed. It will introduce how to set up firmware upgrade and manage firmware in the section.
Prior condition
Make sure the device side supports OTA upgrade service before firmware upgrade.1、To use device side SDK, please refer to the SDK provided by OneNET;
2、If online differential is used for upgrade, corresponding difference shall be inherited to restore SDK. Please contact the manager Mr. Chen (13983745042) for details.
Upgrade flowchart:
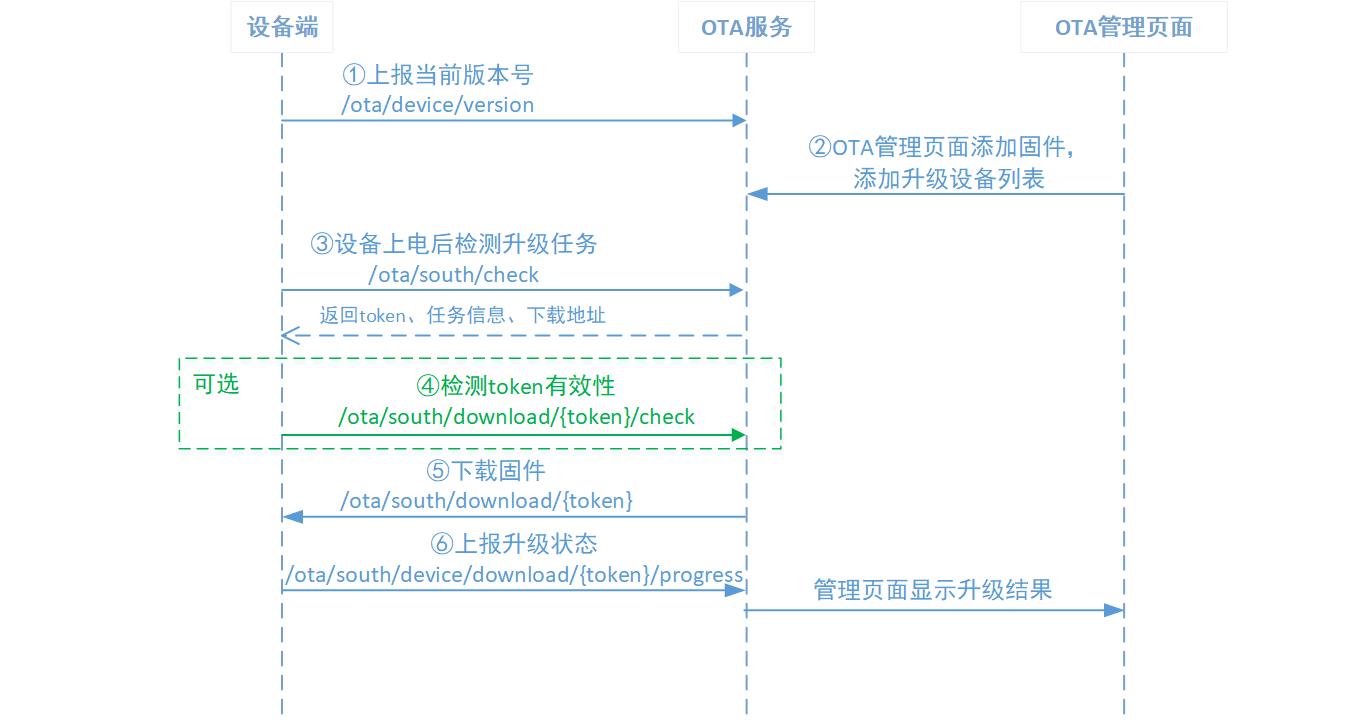
Upgrade flow
Steps
STEP 1 Log in and enter the Developer Center
To provide OneNET OTA service, you need to log in to OneNET platform.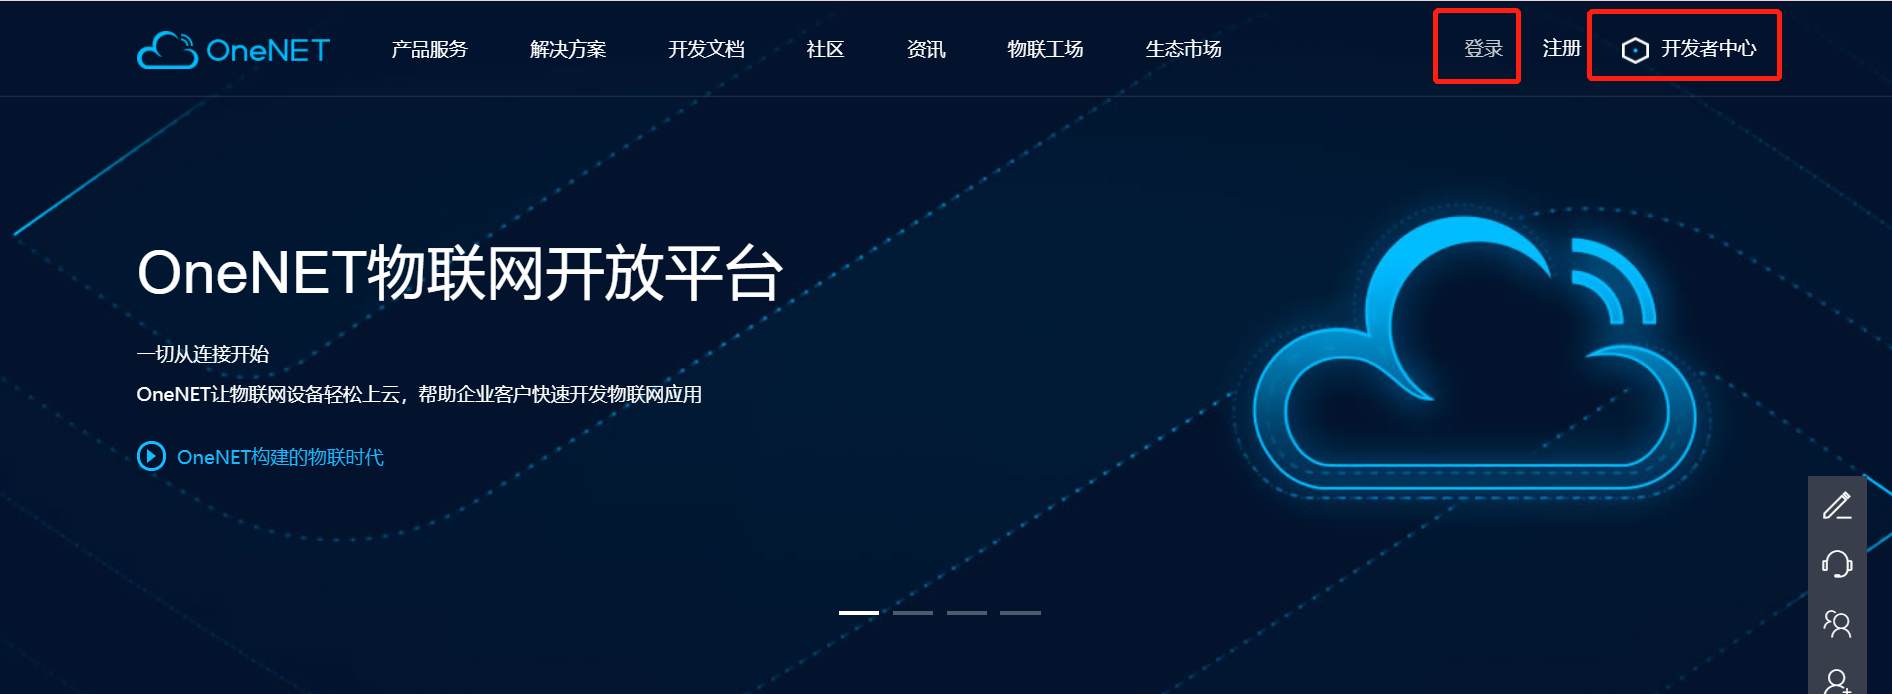
Fig. 1 Developer Center Entry
STEP 2 Enter in remote upgrade OTA.
Enter the developer center, and select all products in navigation bar -> remote upgrade of OTA section.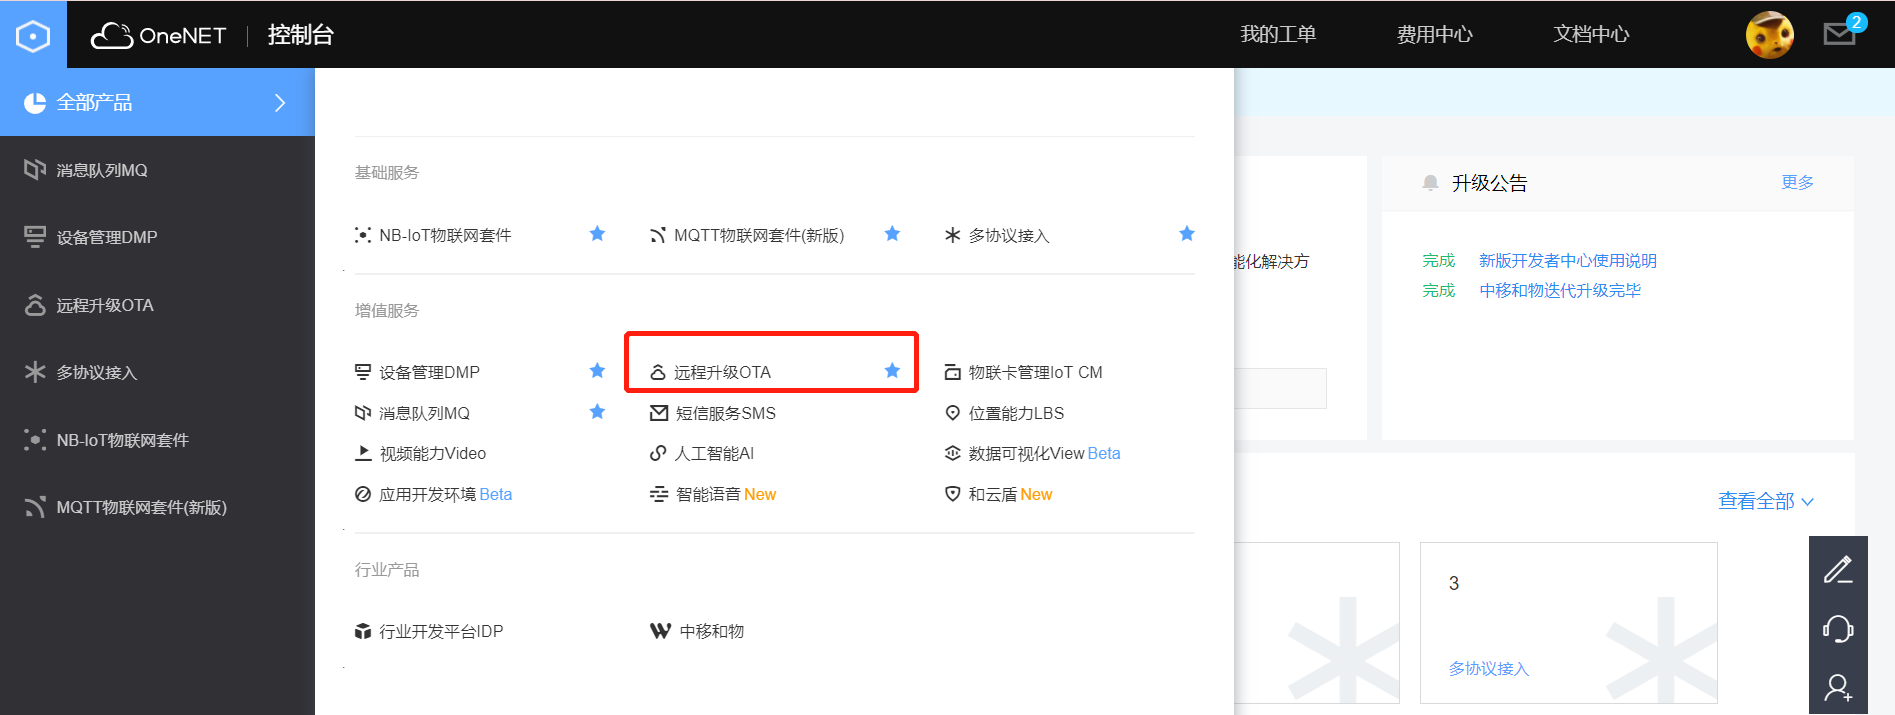
Fig. 2 Remote upgrade OTA entry
Note: To provide better service, the original firmware upgrade of OneNET platform OTA2.0 version has been revised, and a new product management upgrade package is added. For the first entry, the new upgrade package of OTA1.0 version is added to a certain product by default for association.
STEP 3 Select remote upgrade type.
Enter remote upgrade OTA interface, and select the module to be upgraded; then click Add upgrade package button in the upper right corner.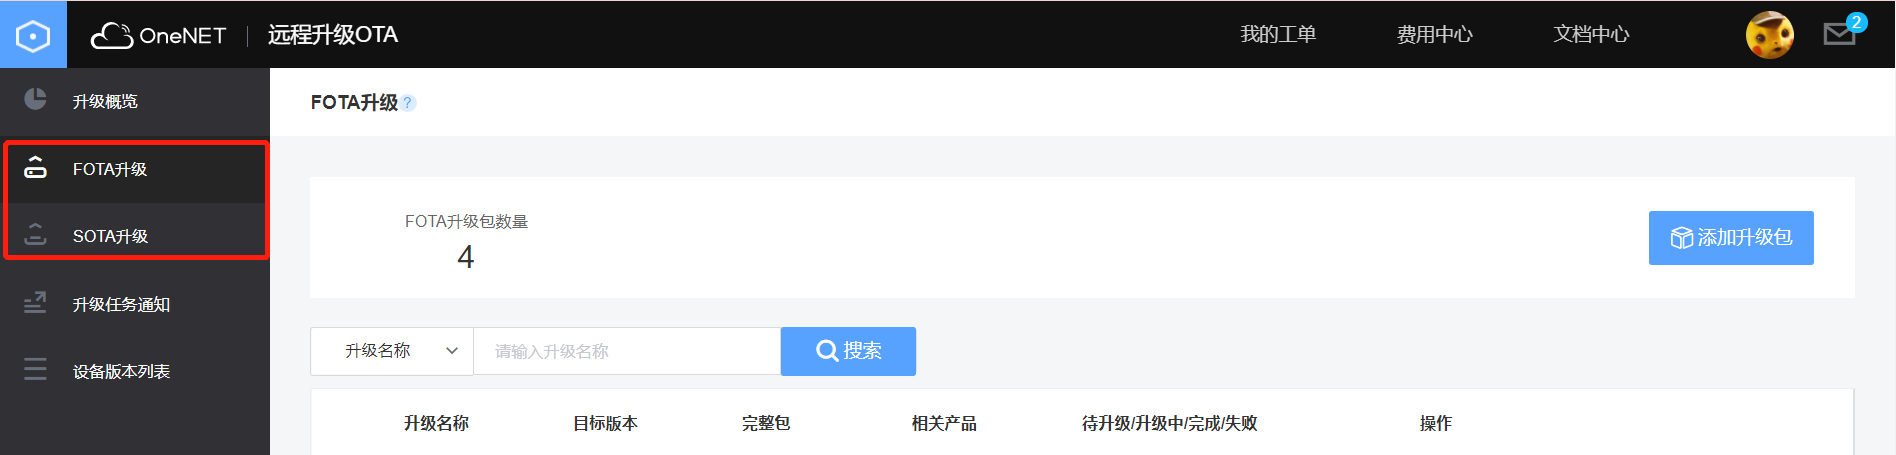
Fig. 3 Select Upgrade Module
- FOTA upgrade: To upgrade the module in the device.
- SOTA upgrade: To upgrade the application in the device. “FOTA upgrade” is selected as an example in this section.
STEP 4 Upload the firmware package to the platform.
In the dialog box of “Add Upgrade Package”, enter firmware information and upload firmware package file.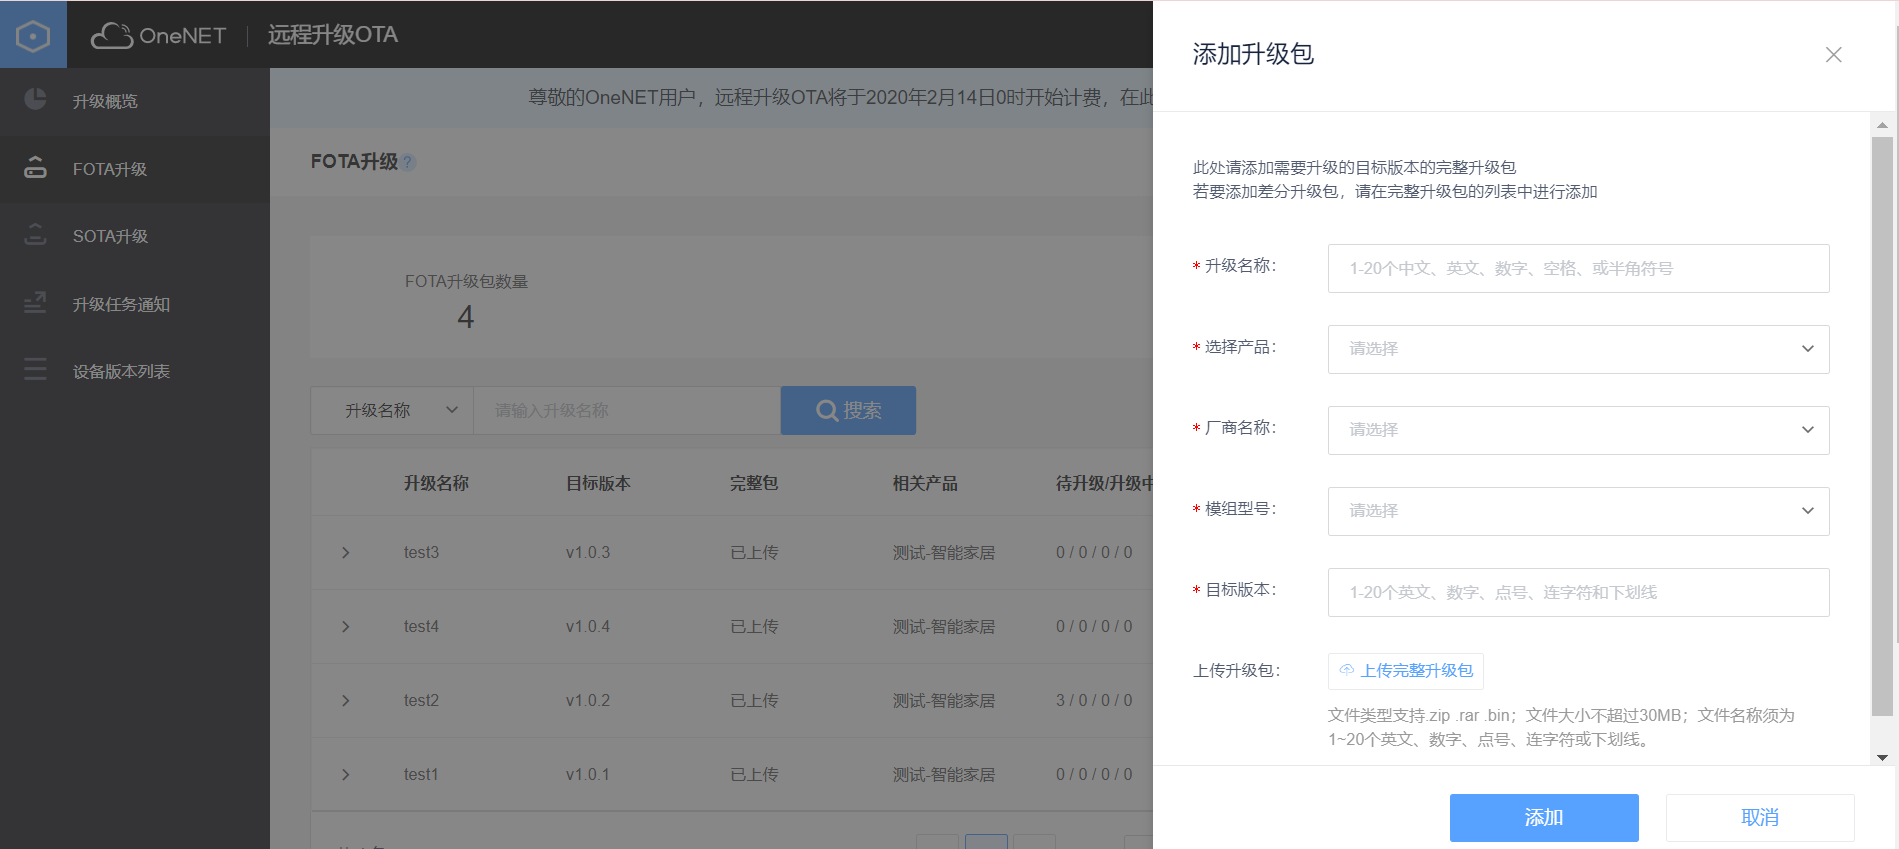
Fig. 4 Upload Firmware Package
- Parameter description:
Parameter Description Upload description 1-20 Chinese and English letters, numbers, spaces, or half-width symbols, the upgrade description shall not repeat. Select a product Select the product that the device to be upgraded belongs to from the drop-down box. If the product doesn’t exist, please select “Add a new product” in basic services of OneNET platform as shown in Fig. 2. Manufacturer name Select the manufacturer name based on the module used for the device. Select “Others” in case the module needed is not shown in the op-down box. Module model Select corresponding model based on the module used by the device. Select “Other” in case no model required is displayed in the drop-down box. Target version 1 -20 English letters, numbers, dots, hyphens and underscores. Upload the upgrade patch. Select the complete package that needs to be upgraded and upload it. The file name of the upgrade package here shall not be in Chinese.
STEP 5 Verify the upgrade.
Click Verify upgrade button, select the verification type (complete package or differential package), and select the device which will be subject to upgrade testing, and perform verification as shown in Fig. 5 and Fig. 6.
Fig. 5 Upgrade Verification Entry 1

Fig. 6 Upgrade Verification Entry 2

Fig. 7 Upgrade Verification
- Parameter description:
| Parameter | Description |
|---|---|
| Upgrade package | Complete package: Perform complete package verification. Differential package: Perform differential package verification. It requires the uploading or online generation of corresponding differential package in advance (Please refer to STEP 6 for details). |
| Select the device | Select the device which will be subject to upgrade testing (If it prompts that there is no device when “Select the device” is clicked, meaning the device doesn’t exist under the product now, or the device exists but the version number has not been reported yet). |
| Version to be upgraded | If differential package verification is chosen, select the initial version of the differential upgrade here. (i.e. current version number of the device) |
After the firmware is uploaded to OneNET platform, it will require verifying the firmware using a small amount of devices. Make sure that the device upgrade test is successful before batch upgrading.
Alternatively, you may click “no verification” button to skip the verification (not recommended).
STEP 6 Add differential package.
To perform differential upgrade, you will need to “Upload” or “generate online” the differential package at the platform. When using differential upgrade:1) Firstly, it is necessary to confirm that the initial version and target version of the differential package already exist, i.e. the “target version” field in the list as shown in Fig. 8.
2) When the initial version and target version of the differential package doesn’t exist, the version can be added using “Add upgrade package” button in the upper right corner of Fig. 8 (Only one version can be added at one time. Please add twice in case both the initial version and target version need to be created).
3) When both the initial version and target version of the differential package already exist, the specific operation is as below:
- Click Add differential package button;
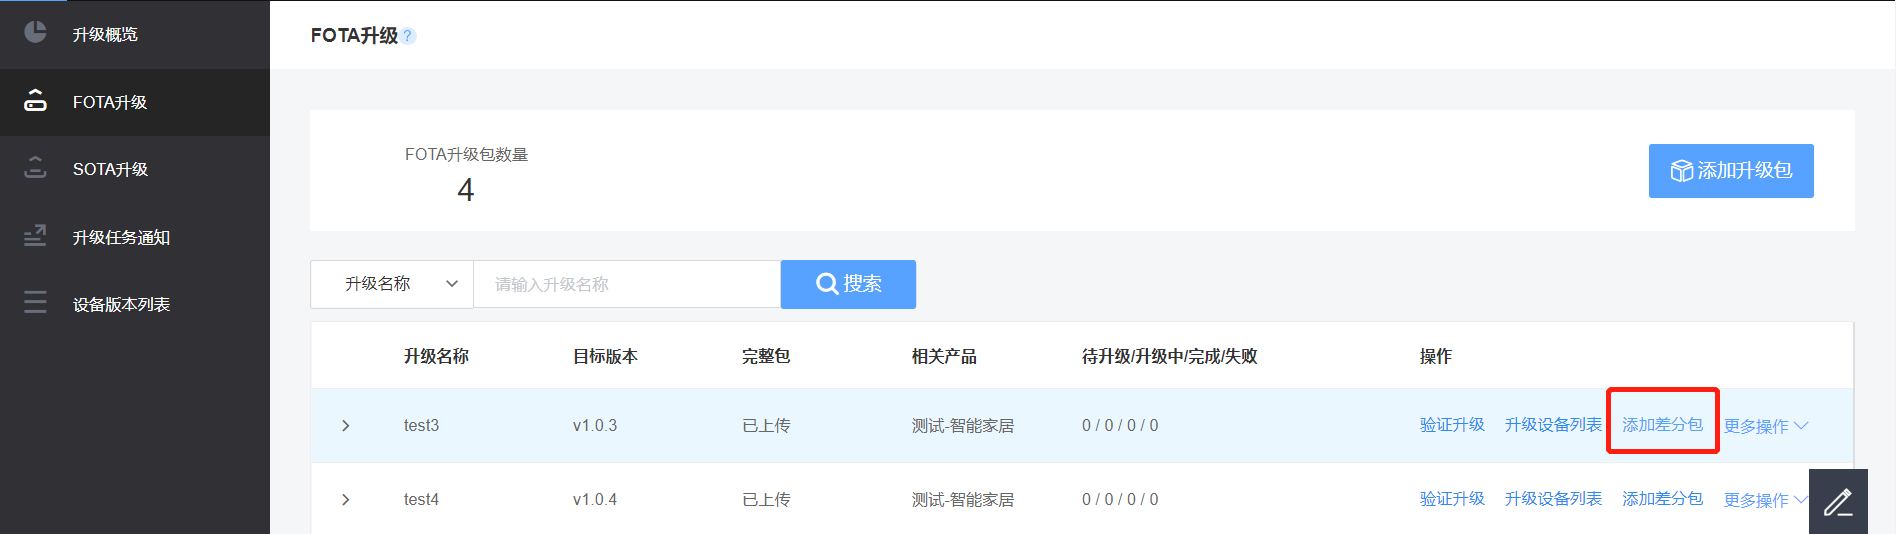
Fig. 8 Entry for Adding Differential Package
- Fill in corresponding information in Add differential package dialog box.
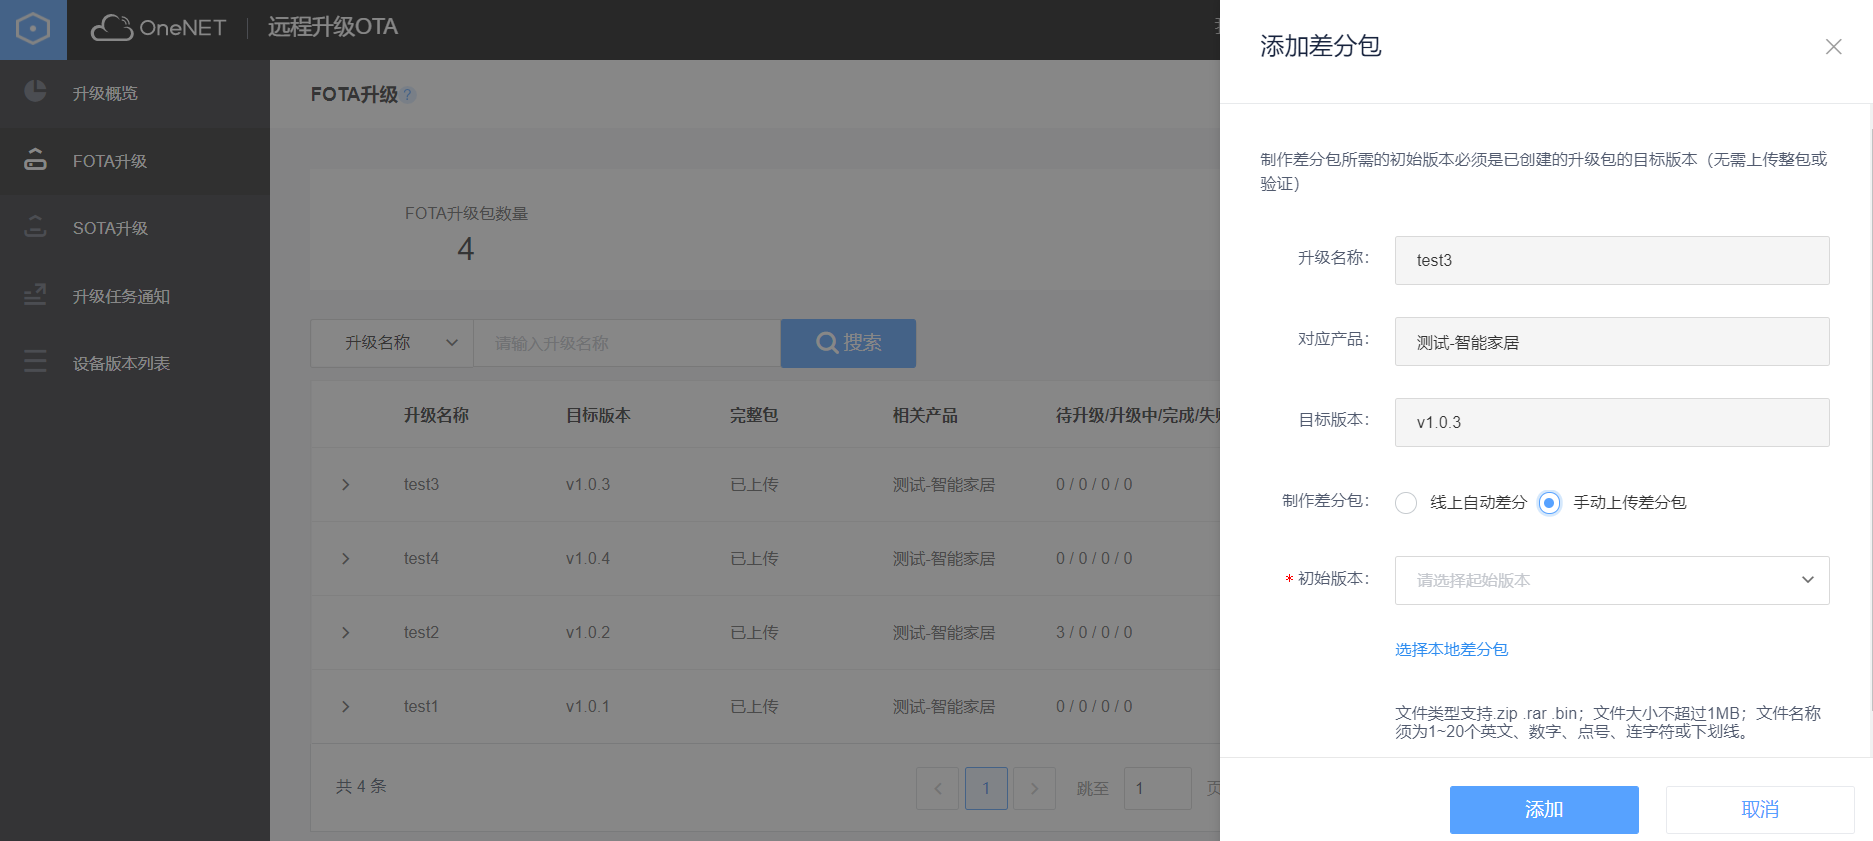
Fig. 9 Add Difference Package
- Parameter description:
| Parameter | Description |
|---|---|
| Upload description | Upgrade task name, automatically filled |
| Corresponding product | Automatically filled |
| Target version | Automatically filled |
| Making differential package | Online automatic difference: When it is needed to use the differential function of OneNET platform, the difference provided by the platform shall be inherited at device side to restore SDK; manual uploading of differential packages: If the user uses his own differential capabilities, he may choose to upload differential packages manually. |
| Initial version | The initial version of the differential upgrade is the version number of the current device. |
STEP 7 Add upgrade device.
(1) Click the list of device to be upgraded to enter upgrade queue module, and click Add Device to be upgraded button in the upper right corner to add a new device upgrade task.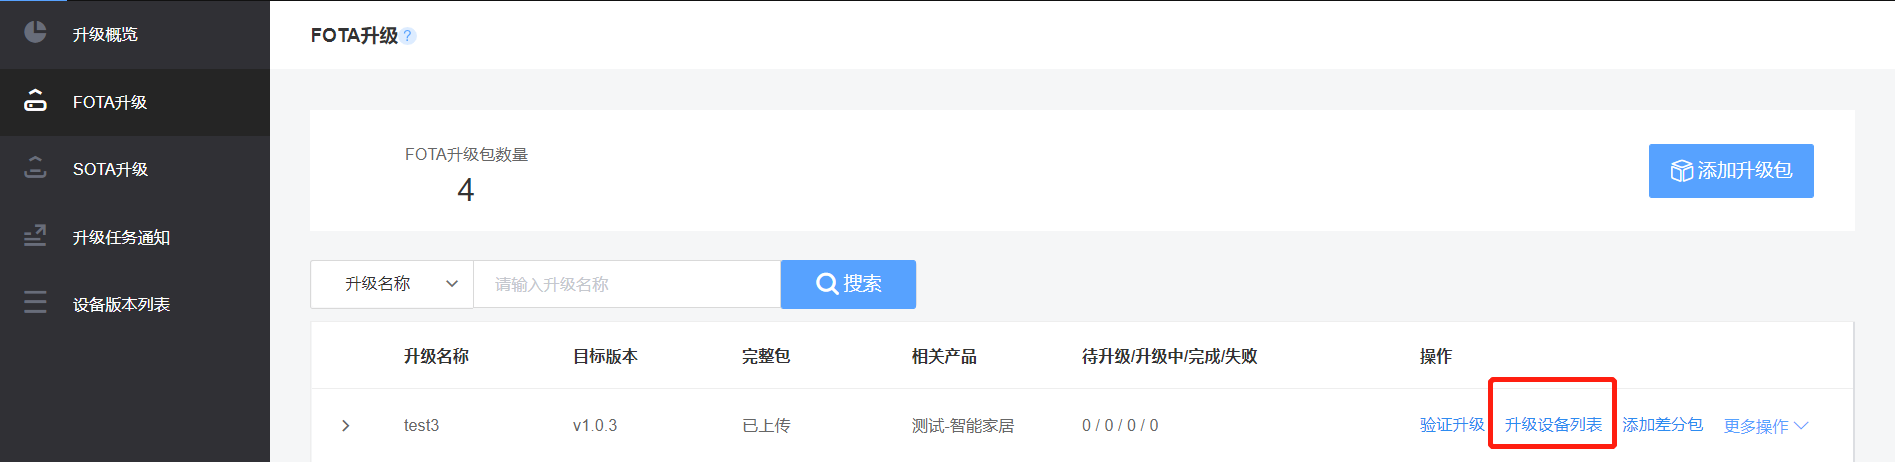
Fig. 10 Entry for Adding Device to be Upgraded
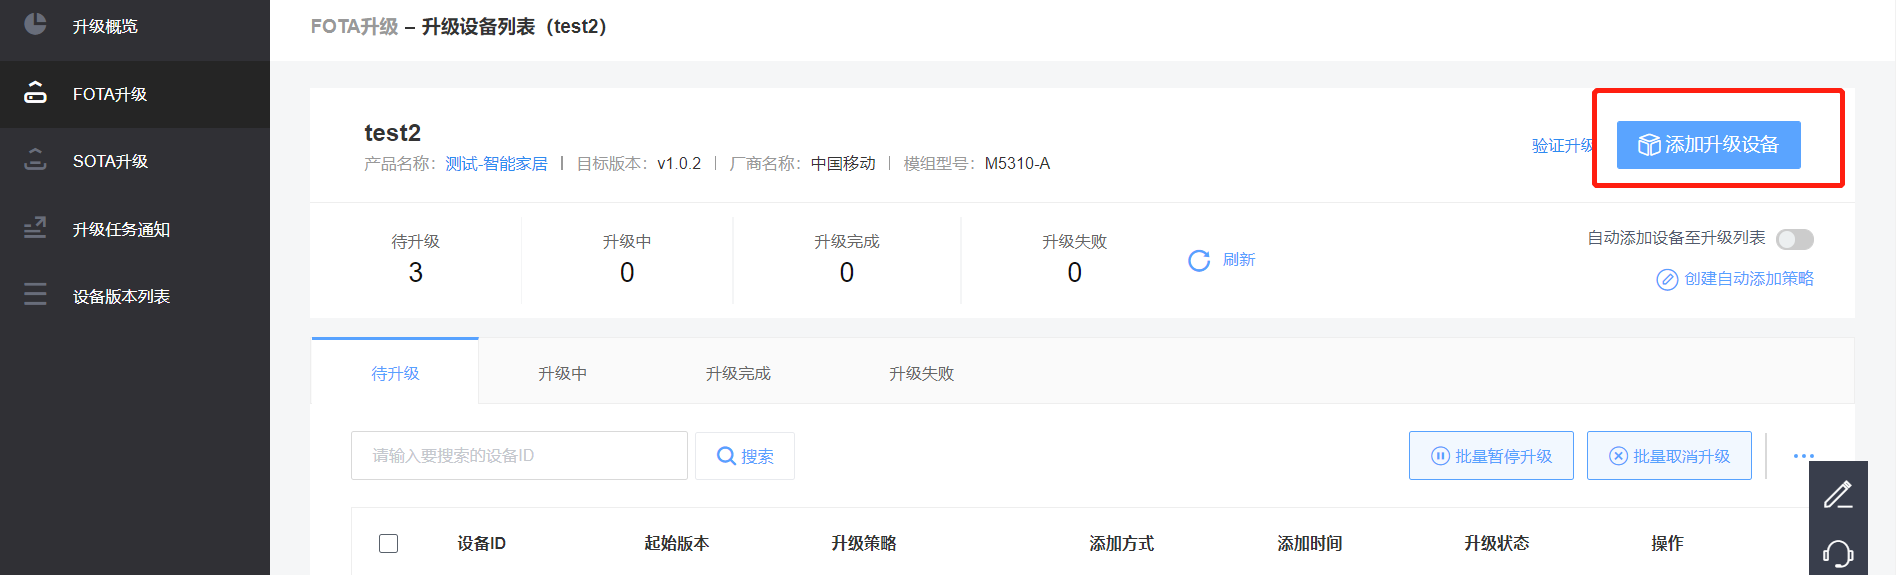
Fig. 11 Entry for Adding Device to be Upgraded
(2) Enter corresponding parameter values in Add Device to Upgrade dialog box.。
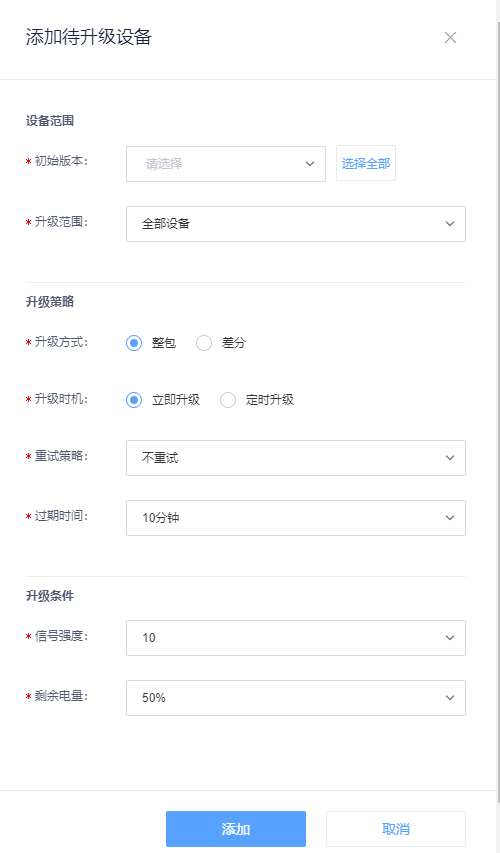
Fig. 12 Details for Adding Device to Upgrade
- Parameter description:
| Parameter | Description |
|---|---|
| Initial version | Select the version scope of the device to be upgraded in the drop-down box. |
| Upgrade scope | When the initial version is selected, if all the devices of the version number will be upgraded or only some of the devices selected will be upgraded. |
| Upgrade method | Complete package, differential package |
| When to upgrade | Upgrade now: The upgrade task become valid immediately; Timed upgrade: The upgrade task will become valid after the time specified is reached. |
| Retry strategy | Don’t retry; Retry: Select corresponding number of times of retry and retry time interval; in this way the strategy is notified to the terminal and it will be controlled by the terminal device. |
| Signal strength | Notify the terminal, and to be controlled by the terminal. |
| Remaining power | Notify the terminal, and to be controlled by the terminal. |
(3) New device created to be upgraded, as shown in following Figure:
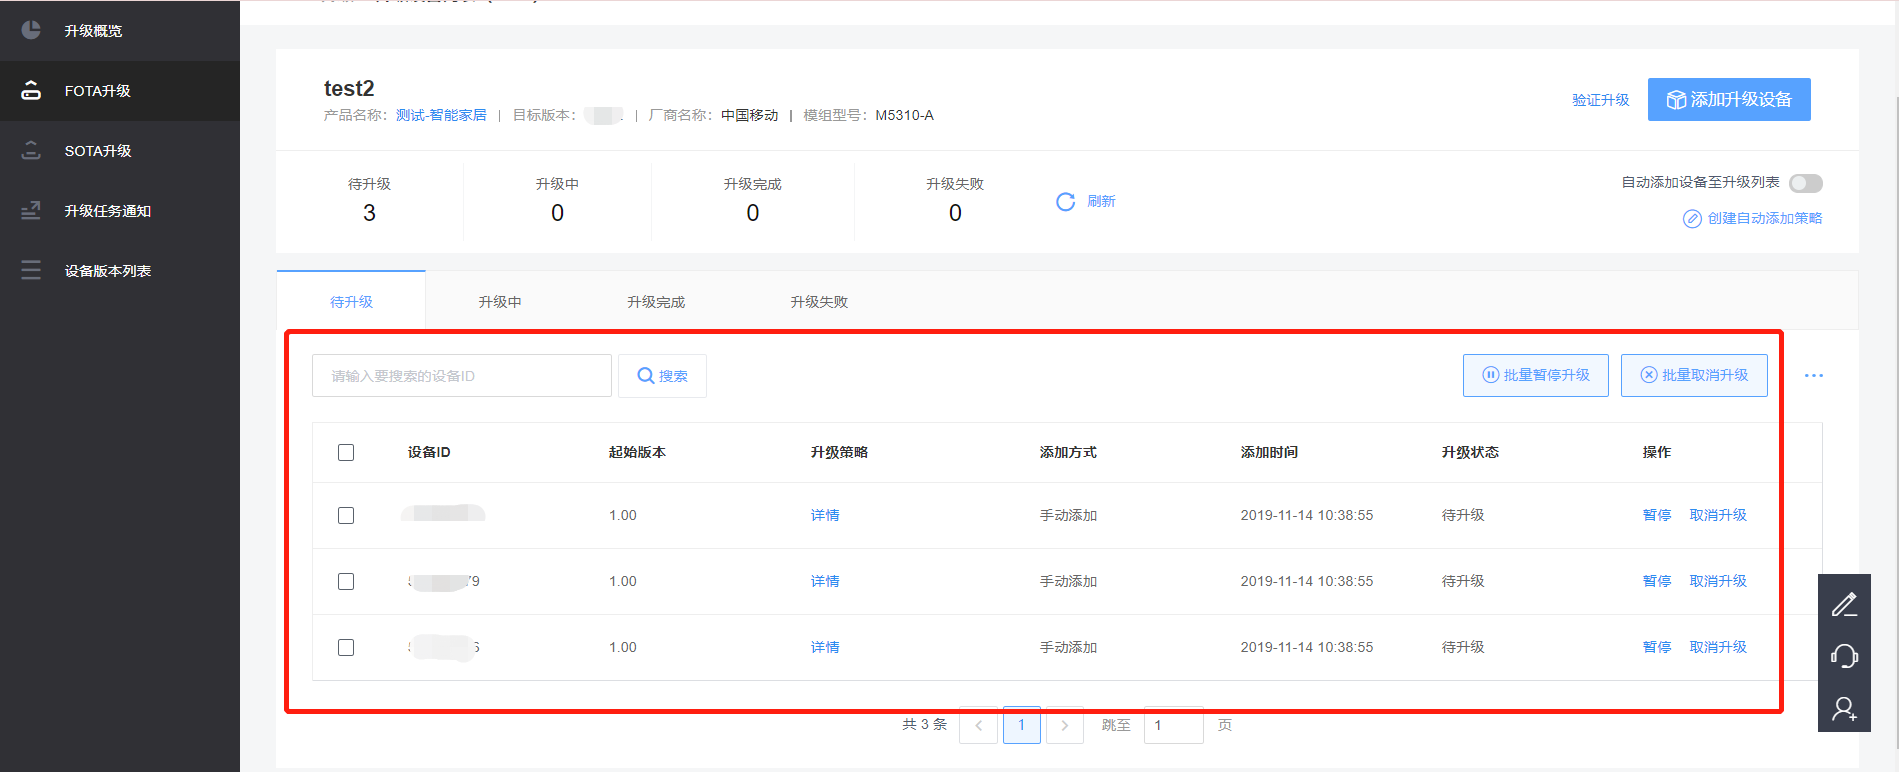
Fig. 13 View of List of Devices to be Upgraded
STEP 8 Call of API of Device Side
The data exchange between the device and the platform is realized using HTTP protocol in standard RESTful format. The interface is authenticated via Authorization.Report current firmware version number of the device, which shall be carried out for the initial upgrade of the device.
Examples:
curl -XPOST
-H "Content-Type:application/json"
-H "Authorization:version=2018-10-31&res=products/33704&et=2529385073&method=sha1&sign=RccQWjT1n5OJ2khw3M4aPckkiFs="
-d '{"f_version": "4.0"}'
"http://ota.heclouds.com/ota/device/version?dev_id=32981907"
Examples:
curl -XGET
-H "Content-Type:application/json"
-H "Authorization:version=2018-10-31&res=products/33704&et=2529385073&method=sha1&sign=RccQWjT1n5OJ2khw3M4aPckkiFs="
"http://ota.heclouds.com/ota/south/check?dev_id=32981907&manuf=001&model=00108&type=1&version=4.0&cdn=false"
(3)Token is detected to be valid.
The step is optional. If it detects an upgrade task successfully in previous step and obtains the information related to the task and the upgrade package, when pulls the upgrade package by the device, OneNET platform will perform verification via token and the token returned from previous step is only valid within 48 hours. Therefore, it is preferred that the users shall check if the token is valid before use here.
Examples:
curl -XGET
-H "Authorization:version=2018-10-31&res=products/33704&et=2529385073&method=sha1&sign=RccQWjT1n5OJ2khw3M4aPckkiFs="
"http://ota.heclouds.com/ota/south/download/ota_MTuflbjJDBclqltMlXX6/check?dev_id=32981907"
After token is successfully detected, the device can obtain the upgrade package from the platform, complete the download of the upgrade package, and upgrade OTA remotely. It supports the download in fragments.
Examples:
curl -XGET
-H "host:ota.heclouds.com"
-H "Range:50500-50999"
"http://183.230.40.50:80/ota/south/download/ota_KUuCwrPAjYj4tCr6Bcdl"
The device reports current resources download progress and upgrade status.
Examples:
curl -XPOST
-H "Content-Type:application/json"
-H "Authorization:version=2018-10-31&res=products/33704&et=2529385073&method=sha1&sign=RccQWjT1n5OJ2khw3M4aPckkiFs="
-d '{"step":100}'
"http://ota.heclouds.com/ota/south/device/download/ota_MP9qVOT0AtsHhUSNYMy7/progress?dev_id=32981907"